Imagine being able to keep an eye on your home, office or business from anywhere in the world with just the click of a button. Well, with the rise of IP cameras and remote viewing options, this is now a reality. But with so many software and hardware configurations available, as well as mobile and cloud-based options, it can be overwhelming to choose the right remote viewing solution for your needs. This comprehensive guide will walk you through the top options for remote viewing software and hardware, mobile apps, and cloud-based solutions. So whether you want to monitor your property for security, keep an eye on your children or pets, or simply have the flexibility to check in on your business while on the go, this guide has got you covered.
Remote Viewing Software

Are you looking for a way to remotely access your IP cameras? Remote viewing software is the solution you need. With the right software, you can access your cameras from anywhere in the world through the internet. This is especially handy for surveillance purposes, as it allows you to keep tabs on your property or business. In this section, we’ll explore some top remote viewing software options and show you how to set them up. But before we dive in, it’s worth mentioning the benefits of IP cameras and how to choose the right one for your needs. Check out our article on the benefits of IP cameras and learn how to choose the right IP camera for your situation.
Top software options for remote viewing
When it comes to choosing software options for remote viewing IP cameras, there are many options to consider. Here are some of the top software options for remote viewing available on the market:
| Software Option | Description |
|---|---|
| Blue Iris | Blue Iris is a popular software program for managing and viewing IP cameras. It offers many features, including live streaming, motion detection, and recording. |
| Xeoma | Xeoma is a powerful and easy-to-use video surveillance software. It offers many features including motion detection and email notifications. |
| Milestone XProtect | Milestone XProtect is a professional video management software designed for large-scale installations. It offers advanced features like multi-server, multi-site deployments and supports various camera models. |
| ZoneMinder | ZoneMinder is an open-source video surveillance software that is popular among users who require advanced security features. It is easy to customize and offers a wide range of integrations. |
| iSpy | iSpy is a free and open-source video surveillance software that supports multiple devices for remote viewing. It offers advanced motion detection and alerts features. |
All of these software options have their own strengths and weaknesses, depending on the user’s needs. One way to optimize remote viewing software is to make sure that the software is compatible with your IP camera. If the remote viewing software is not compatible, it may not work properly or may not be able to stream video correctly.
If you want to learn more about how to optimize remote viewing for IP cameras, you can also check out some additional resources such as IP Camera Installation Tips for Max Security, Wired vs. Wireless IP Cameras, Smart Home IP Cameras for Security, Knowledge About IP Cameras and Privacy, and Future Trends and Innovations in IP Cameras.
How to set up remote viewing software
Configuring remote viewing software can be a challenging task for those who are not well-acquainted with the process. However, if you follow the steps below, you can easily set up remote viewing on your computer.
Step 1: Install the remote viewing software on your computer. Make sure to download the latest version from the manufacturer’s website to ensure compatibility with your IP camera.
Step 2: Connect your IP camera to your computer using a network cable. Check the connection by opening your browser and entering your camera’s IP address. If you can see the preview of your camera, you have successfully connected it to your computer.
Step 3: Open the remote viewing software and click on the ‘Add Camera’ button. Enter the camera details such as name, IP address, username, and password.
Step 4: If your camera supports multiple streams, configure and select the one that you want to use for remote viewing. Make sure you select the appropriate resolution, frame rate, and compression settings based on your network speed.
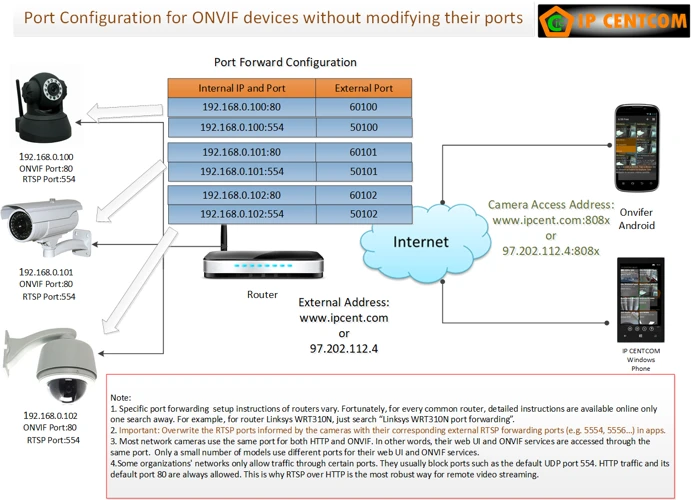
Step 5: Set up the port forwarding on your router to allow external access to your IP camera. This step varies depending on your router model. Refer to the manufacturer’s guide on setting up port forwarding.
Step 6: Once you have set up port forwarding, enter your router’s external IP address and the port number in the remote viewing software. Save the settings.
Step 7: Now you can access your IP camera from any remote location with an internet connection. Open the remote viewing software and enter the external IP address and port number. Enter the camera’s username and password to log in.
By following these steps, you can enjoy remote viewing of your IP camera with ease. Remember to keep your software and firmware updated regularly to ensure compatibility and security.
Tips for optimizing remote viewing software
When it comes to optimizing remote viewing software, there are a few key tips to keep in mind.
1. Check your network speed: A slow network can cause poor remote viewing performance. Make sure you have a high-speed internet connection with enough bandwidth to handle the amount of traffic generated by your camera system.
2. Adjust video quality settings: If you’re experiencing lag or poor video quality, try adjusting the video quality settings within your remote viewing software. Lowering the resolution or frame rate can improve performance.
3. Keep your software up to date: Software updates often include bug fixes and performance improvements. Be sure to keep your remote viewing software up to date to ensure you have access to the latest features and improvements.
4. Close other applications: Running multiple applications or programs on your computer while using remote viewing software can cause performance issues, particularly if those applications use a lot of system resources. Close any unnecessary programs to free up resources for your remote viewing software.
5. Optimize your hardware: Make sure your computer meets the recommended hardware specifications for your remote viewing software. Adding additional RAM or upgrading your graphics card can improve performance.
6. Use a wired connection: For the best performance, use a wired connection rather than Wi-Fi. A wired connection is generally more reliable and can provide faster connection speeds.
7. Consider using a VPN: If you’re accessing your remote viewing software from outside your home network, consider using a VPN to ensure a secure and reliable connection.
By following these tips, you can optimize your remote viewing software for the best possible performance.
Hardware Configurations for Remote Viewing
When it comes to remote viewing, having the right hardware is just as important as having the right software. Without the proper hardware configurations, you may experience lagging or pixelated images, or even worse, your remote viewing may not work at all. In this section, we will discuss the recommended hardware for optimal remote viewing and provide step-by-step guidance on how to set up your hardware. Additionally, we’ll cover common hardware issues and provide tips on how to troubleshoot them. So let’s dive into the world of hardware configurations for remote viewing!
Recommended hardware for optimal remote viewing
When it comes to remote viewing of IP cameras, having the right hardware can make a huge difference in terms of performance and reliability. In this section, we’ll take a look at some of the recommended hardware for optimal remote viewing and highlight their key features.
We’ve compiled a list of some of the most popular options and their specifications in the following table:
| Hardware | Specifications |
|---|---|
| PC or Laptop | Intel i5 or higher processor, 8GB or more RAM, dedicated graphics card, wired Ethernet or high-speed Wi-Fi, Windows or MacOS operating system. |
| NAS Device | Dual-core or higher processor, at least 2GB RAM, support for RAID 0, 1, or 5, wired Ethernet connectivity, compatibility with IP camera software. |
| Router | Gigabit Ethernet ports, support for Quality of Service (QoS), MU-MIMO technology, dual-band Wi-Fi, VPN server/client, firewall protection. |
| Network Switch | Gigabit Ethernet ports, VLAN support, QoS, link aggregation, management features. |
An Intel i5 or higher processor and 8GB RAM are recommended for a PC or laptop to ensure smooth and lag-free performance while viewing multiple cameras simultaneously. Additionally, a dedicated graphics card will enhance video playback and improve the user experience. Wired Ethernet or high-speed Wi-Fi is also essential for a stable and reliable connection.
A Network Attached Storage (NAS) device with a dual-core or higher processor and at least 2GB RAM is a good option for users who need to store large amounts of video footage. NAS devices with support for RAID 0, 1, or 5 can ensure data redundancy and prevent data loss in the event of a hard drive failure. Compatibility with IP camera software is also important to ensure seamless integration.
A high-performance router with gigabit Ethernet ports and support for Quality of Service (QoS) can help prioritize video traffic and reduce lag. Dual-band Wi-Fi and MU-MIMO technology can improve wireless performance and increase overall network capacity. VPN server/client and firewall protection are also important features for remote access and security.
Finally, a network switch with gigabit Ethernet ports and support for VLANs can help segment the network for improved performance and security. QoS and link aggregation can further enhance network performance, while management features can simplify network administration.
By investing in the right hardware, remote viewing of IP cameras can become a hassle-free experience. Remember to choose hardware that is compatible with your IP camera software and network configuration, and always opt for high-quality, reliable components to ensure your system runs smoothly.
How to set up hardware for remote viewing
Setting up the hardware for remote viewing is an important step to ensure that you have an optimal experience. Follow these steps to get started:
Step 1: Choose the right IP camera
The first step to setting up the hardware for remote viewing is choosing the right IP camera for your needs. Consider factors such as resolution, field angle, and night vision capabilities when making your selection.
Step 2: Connect the camera to your network
Once you have chosen your camera, the next step is to connect it to your network. You can do this by using an Ethernet cable or connecting wirelessly. Make sure to follow the manufacturer’s instructions for setting up the camera.
Step 3: Configure the camera’s settings
After you have connected the camera to your network, you will need to configure its settings. This includes setting up a username and password, adjusting the resolution and quality, and enabling motion detection.
Step 4: Set up port forwarding
To enable remote viewing, you will need to set up port forwarding on your router. This process allows you to access the camera’s feed from outside your network. Check the manufacturer’s instructions for information on the required ports to forward.
Step 5: Install and configure your remote viewing software
The final step is to install and configure your remote viewing software. This will allow you to access the camera’s feed from your computer or mobile device. Follow the manufacturer’s instructions for setting up the software and make sure to enter the correct IP address and port number.
By following these steps, you can set up the hardware for remote viewing and enjoy the benefits of being able to monitor your home or business from anywhere.
Troubleshooting common hardware issues
When it comes to remote viewing of IP cameras, hardware configurations can sometimes be a source of frustration for users. Common hardware issues, such as poor connection or slow loading times, can greatly affect the user experience. Fortunately, these issues can often be easily resolved with a few troubleshooting solutions.
Here are some common hardware issues and their corresponding troubleshooting solutions:
| Issue | Solution |
|---|---|
| Low Signal Strength | If the signal strength is low, try relocating the camera closer to the router or access point. You can also try upgrading to a stronger router or installing a new access point. Alternatively, you can use a Wi-Fi extender to boost the signal. |
| Slow Loading Times | If the video feed is taking a long time to load, it could be due to slow internet speeds. To resolve this, try upgrading your internet plan, or using a wired connection instead of Wi-Fi. You can also reduce the resolution and bitrate of the camera feed to improve loading times. |
| Power Issues | If the camera is not turning on, check that it is properly plugged into a power source. If it is connected to a switch, make sure the switch is on. You can also try resetting the camera by unplugging it and plugging it back in. |
| Compatibility Issues | If the camera is not compatible with your viewing device or software, you may need to purchase a new camera or update your software. Check the manufacturer’s website for compatibility information before making a purchase. |
| Security Concerns | If you are experiencing security issues, such as unauthorized access to the camera feed, make sure the camera’s firmware is up to date. You can also change the default username and password to something more secure. Consider using a VPN or firewall to add an extra layer of protection. |
By using these troubleshooting solutions, you can quickly resolve common hardware issues and enjoy seamless remote viewing of your IP cameras.
Using Mobile Devices for Remote Viewing
When it comes to remote viewing of IP cameras, using mobile devices can be an incredibly convenient option. Being able to monitor your security system wherever you are, from the palm of your hand, offers unparalleled peace of mind. However, not all mobile devices are created equal, and knowing which apps and operating systems to use can be a bit of a puzzle. In this section, we’ll explore the top mobile options for remote viewing, as well as provide step-by-step instructions for setting up your mobile device for optimal remote viewing performance.
Top mobile apps for remote viewing
Remote Viewing options for IP cameras have become more accessible and convenient with the advent of mobile apps that allow users to access their camera feed from their mobile devices. Here are some of the top mobile apps for remote viewing:
- IP Cam Viewer: One of the most popular mobile apps for remote viewing, IP Cam Viewer is compatible with most IP cameras and allows users to access their camera feeds over the internet or through Wi-Fi. It also provides features like motion detection and audio support.
- TinyCam Monitor: Another highly rated app, TinyCam Monitor supports a wide range of IP cameras and allows users to monitor their cameras remotely over 3G, 4G, and Wi-Fi networks. It also has features like two-way audio communication and background recording.
- Milestone Mobile: This app is specifically designed for Milestone XProtect® video management software and provides access to live and recorded video from cameras on the XProtect VMS platform. It also supports PTZ control and has a customizable layout.
- NVSIP: NVSIP is a free mobile app that supports a wide range of IP cameras and provides features like remote playback and push notifications. It also has a user-friendly interface and supports multiple languages.
- AtHome Camera: A popular choice for home security, AtHome Camera allows users to turn their smartphones into IP cameras and access their feeds remotely from another device. It also has motion detection and alerts users when motion is detected.
There are plenty of other mobile apps available for remote viewing, but these are some of the highest-rated and most widely used options. It’s important to note that not all IP cameras are compatible with every app, so it’s important to do research and ensure that the app you choose is compatible with your camera.
How to set up mobile devices for remote viewing
One of the easiest and most convenient ways to remotely view IP cameras is through a mobile device. Whether you have an Android or iOS device, you can set up remote viewing in just a few simple steps.
Step 1: Install the Remote Viewing App
The first step in setting up remote viewing on your mobile device is to download and install the remote viewing app for your specific IP camera. Some of the top apps for remote viewing include IP Cam Viewer, tinyCam Monitor, and Foscam.
Step 2: Connect Your Mobile Device to Your Wi-Fi Network
To view your IP camera remotely, your mobile device needs to be connected to the same Wi-Fi network that your IP camera is connected to. Make sure your mobile device is connected to the Wi-Fi network before proceeding to the next step.
Step 3: Configure the Remote Viewing App
After you have installed the remote viewing app, open it and follow the prompts to add your IP camera. In most cases, you’ll need to enter the IP address, username, and password for your IP camera.
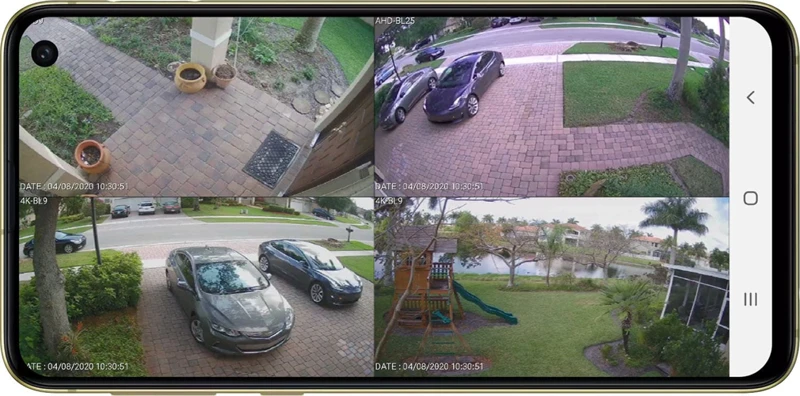
Step 4: Adjust the Display Settings
Once you’ve added your IP camera to the remote viewing app, you can adjust the display settings to fit your preferences. You can choose to view a single camera full screen or view multiple cameras at once in a grid view. You may also be able to adjust the resolution and frame rate of the video stream to optimize performance.
Step 5: Access the App from Anywhere
Once you’ve completed the setup process, you can access your IP camera from anywhere using your mobile device. Simply open the remote viewing app, select the camera you want to view, and enjoy live streaming video from your IP camera.
| Step | Description |
|---|---|
| Step 1 | Download and install the remote viewing app for your specific IP camera |
| Step 2 | Connect your mobile device to the same Wi-Fi network that your IP camera is connected to |
| Step 3 | Configure the remote viewing app by adding your IP camera’s IP address, username, and password |
| Step 4 | Adjust the display settings to fit your preferences, such as viewing a single camera full screen or multiple cameras at once in a grid view |
| Step 5 | Access the app from anywhere to view live streaming video from your IP camera |
Now that you know how to set up remote viewing on your mobile device, you can enjoy the convenience and flexibility of monitoring your IP cameras from anywhere in the world.
Tips for mobile remote viewing on different operating systems
When it comes to remote viewing on mobile devices, different operating systems can present unique challenges. Here are some tips to help optimize your mobile remote viewing experience, regardless of your device’s operating system:
- Enable notifications: Make sure to enable push notifications for your remote viewing app so that you can receive alerts in real-time. This will ensure that you’re always up to date on any important activity captured by your IP camera.
- Choose high-quality video settings: Select the highest video quality settings that your device’s screen and internet connection can handle. This will provide you with the best possible image resolution and clarity when viewing your camera’s footage remotely.
- Close other apps: To optimize your device’s performance and ensure a smooth remote viewing experience, close any other apps running in the background that you aren’t using.
- Use WiFi when possible: If you’re using a mobile device to remotely view your IP camera, connecting to WiFi can significantly improve video quality and reduce buffering or lagging issues.
- Adjust your device’s screen brightness: Depending on the lighting conditions in the area you’re viewing, adjusting your device’s screen brightness can help you better see and analyze camera footage.
- Keep your app and device up to date: Regularly updating both your remote viewing app and device’s operating system can help ensure that you’re using the most stable and secure versions of each.
By keeping these tips in mind, you can help ensure optimal mobile remote viewing performance regardless of which operating system you’re using.
Cloud-Based Remote Viewing
In today’s fast-paced world, it’s important to have access to surveillance footage no matter where you are. Whether you’re a business owner, a busy parent, or just looking to keep an eye on your property, cloud-based remote viewing is a convenient and secure option for accessing your IP camera footage from anywhere with an internet connection. By utilizing the power of the cloud, you can enjoy a seamless remote viewing experience with features like live streaming, motion detection alerts and more. In this section, we’ll explore the top cloud-based options for remote viewing and provide step-by-step instructions on how to set up your system for optimal performance.
Top cloud-based options for remote viewing
When it comes to remote viewing options for IP cameras, using cloud-based services can provide a convenient and secure way to access your camera feeds from anywhere. Here are five top cloud-based options that you may want to consider:
| Service | Features | Price |
|---|---|---|
| Google Nest | 24/7 live streaming, alert notifications, facial recognition, two-way audio, cloud storage | Starts at $6 per month or $60 per year for 30-day video history |
| Amazon Web Services (AWS) | Scalable and flexible cloud storage, easy integration with AWS IoT and other services, high security and compliance standards | Pricing varies depending on storage and data usage |
| Microsoft Azure | Real-time video analytics, AI-based object detection and tracking, secure and compliant cloud storage | Pricing varies depending on usage and storage options |
| iSpyConnect | Remote access and control of cameras, motion and sound detection, alerts and notifications, scheduling and automation | Free for basic features, premium plans start at $7.95 per month or $79 per year |
| Angelcam | Remote access and control of cameras, cloud recording and storage, PTZ control, secure and private sharing of camera feeds | Essential plan starts at $9 per month or $90 per year, premium plans offer more features |
Each of these cloud-based options offers unique features and pricing plans, so it’s important to consider your specific needs and budget before choosing one. With proper setup and configuration, cloud-based remote viewing can provide a reliable and flexible way to monitor your IP cameras from wherever you are.
How to set up cloud-based remote viewing
Setting up cloud-based remote viewing can seem like a daunting task, but it is actually quite simple! Follow these steps to get started:
- Choose a cloud-based remote viewing service: Before you can set up remote viewing through the cloud, you need to choose a service that provides it. Do some research to find a reliable and affordable service that meets your needs. Some popular options include Google Drive, Dropbox, and Amazon Web Services.
- Create an account: Once you have chosen a service, create an account with them. Follow their instructions to set up your account and link any devices (such as your IP camera) that you want to use for remote viewing.
- Install any necessary software: Depending on the service you choose, you may need to download and install a specific software program to facilitate remote viewing. Follow the instructions provided by the service to install any necessary software on your computer or other devices.
- Configure your IP camera: In order to view your camera’s feed remotely, you need to configure it to send footage to your cloud service. This process will vary based on the specific camera you have, so consult your camera’s manual or look up instructions specific to your camera model.
- Link your camera to your cloud service: Once your camera is configured, you need to link it to your cloud service. This is usually done through the settings on your cloud service account. Follow the instructions provided to link your camera to the cloud and enable remote viewing.
- Access your camera feed: Congratulations, you have now set up cloud-based remote viewing for your IP camera! To access your camera’s feed remotely, simply log in to your cloud service account and navigate to the remote viewing section. You should now be able to view your camera feed from anywhere with an internet connection.
Remember, if you encounter any issues during setup or use of your cloud-based remote viewing service, consult the service’s help resources or contact their support team for assistance.
Tips for optimizing cloud-based remote viewing performance
Optimizing cloud-based remote viewing performance can be a challenging task but it is necessary for ensuring clear and uninterrupted access to your cameras. Here are some tips for maximizing the performance of cloud-based remote viewing:
- Choose a reliable cloud service provider: Not all cloud service providers are created equal. Opt for a trusted provider that can guarantee minimal downtime and strong security measures.
- Use a high-speed internet connection: The speed of your internet connection greatly affects your ability to access cloud-based remote viewing. Make sure you have a high-speed internet connection that can handle the amount of data being transferred.
- Adjust video quality settings: Lowering the video quality can greatly enhance the performance of cloud-based remote viewing. Adjust the quality settings to a level that still provides clear visuals while minimizing lag.
- Monitor network bandwidth: Overloading your network bandwidth can cause cloud-based remote viewing to slow down or even crash. Keep an eye on your network bandwidth usage to ensure smooth performance.
- Use compression technology: Compression technology reduces the bandwidth needed to transmit video data, resulting in faster and smoother cloud-based remote viewing. Enable compression technology whenever possible, but be mindful of the reduction in video quality.
- Close unnecessary applications: Running multiple applications simultaneously can put a strain on your system resources, which can in turn negatively affect cloud-based remote viewing. Close any unnecessary applications before accessing cloud-based remote viewing.
By employing these tips, you can significantly improve the performance of your cloud-based remote viewing experience. However, keep in mind that every system is unique and may require additional customization or modifications to achieve optimal results.
Conclusion
After delving into the various options for remote viewing IP cameras, it’s clear that there is no one-size-fits-all solution. The best choice for you will depend on factors such as your budget, technical expertise, and specific needs.
Remote viewing software can provide a cost-effective way to remotely access your cameras, but may require some technical know-how to set up and optimize. On the other hand, hardware configurations offer high-performance and stability, but come at a higher cost and may require professional installation.
For those on the go, mobile remote viewing is a handy option, with apps available for both iOS and Android devices. However, optimizing remote viewing on different operating systems can require some troubleshooting.
Lastly, cloud-based remote viewing presents a convenient option for those who don’t want to manage hardware or software themselves, but may require a stable internet connection and subscription fees.
Ultimately, the best solution for you will depend on your unique needs and preferences. Consider the factors that matter to you, such as cost, convenience, and technical expertise, when deciding on a remote viewing option for your IP cameras. With the plethora of options available, there’s sure to be one that meets your needs.
Frequently Asked Questions
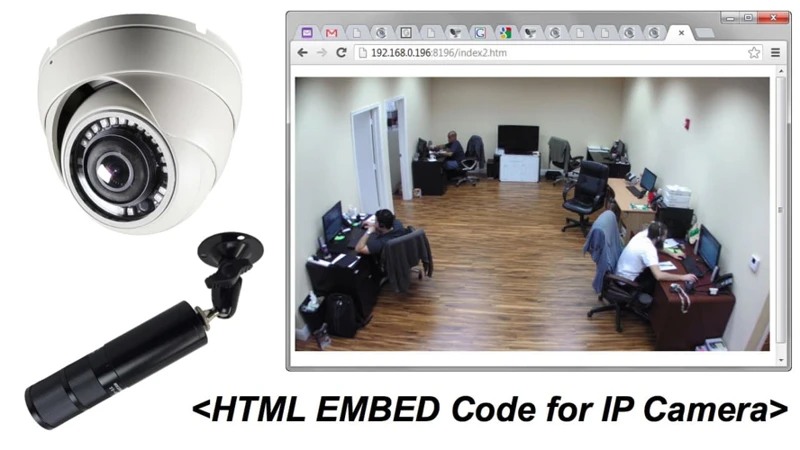
1. Can I view my IP camera remotely without any additional software or hardware?
Yes, as long as your IP camera has a built-in web server, you can access it remotely through your web browser by typing in its IP address.
2. What software do I need to view my IP camera remotely?
You can use remote viewing software such as VLC, Blue Iris, or ONVIF Device Manager to view your IP camera remotely.
3. Is it possible to view my IP camera remotely using my mobile device?
Yes, there are mobile apps available such as IP Cam Viewer, TinyCam Monitor, and iCamViewer that allow you to view your IP camera remotely on your mobile device.
4. Can I view multiple IP cameras remotely at the same time?
Yes, you can use remote viewing software that supports multiple camera viewing, such as ONVIF Device Manager or Blue Iris.
5. Do I need to have a static IP address to view my IP camera remotely?
No, you can use Dynamic DNS services such as No-IP or DynDNS to map your dynamic IP address to a domain name, making it easier to access your IP camera remotely.
6. How do I access my IP camera remotely through a web browser?
You can access your IP camera remotely through a web browser by typing in its IP address, followed by the port number and login credentials, if required.
7. What hardware do I need to view my IP camera remotely?
You can use any device with a web browser or remote viewing software installed to view your IP camera remotely, such as a laptop, desktop computer, tablet, or mobile device.
8. Is it possible to view my IP camera remotely using cloud-based services?
Yes, there are cloud-based services available such as Nest Cam, Arlo, and Blink that allow you to view your IP camera remotely through their respective apps or web portals.
9. How do I troubleshoot common hardware issues with remote viewing?
You can troubleshoot common hardware issues with remote viewing by checking your internet connection, resetting your router or modem, checking your camera’s power supply, and ensuring that your camera’s firmware is up to date.
10. Can I view my IP camera remotely using a VPN?
Yes, you can access your IP camera remotely through a VPN connection, which provides added security and privacy by encrypting your data and masking your IP address.